How to create pages dynamically in Gatsby using MDX
3 min read

In this post, we will be looking into how to create pages programmatically using MDX in Gatsby.
To get up and running, we need to install a couple of plugins
npm i gatsby-plugin-mdx @mdx-js/mdx @mdx-js/react
Then we need to configure gatsby-mdx inside gatsby-config.js
So first we need to resolve the plugin gatsby-plugin-mdx because we also want to pass in options object which defines what layout that we want to use in our MDX files.
Note: require.resolve give us the absolute path name.
As a result, any MDX files that we load will be loaded into the Layout.js template that we defined in the gatsby-config.
gatbsy-config.js
1plugins: [2{3resolve: "gatsby-plugin-mdx",4options: {5defaultLayouts: {6default: require.resolve("./src/components/Layout.js"),7},8},9},10];11
Now that we have installed the plugin, the plugin will look for mdx files in the pages or posts directory which we defined in gatsby-config.
So to get the post pages into gatsby, we are going to use another plugin gatsby-source-filesystem
npm i gatsby-source-filesystem
to get them to the data layer so that we can access them.
The gatsby source file system is a way to use local files as part of the graphql data layer.
Once it gets installed, we need to update gatsby config to resolve source filesystem plugin
gatsby-config.js
1plugins: [2{3resolve: "gatsby-plugin-mdx",4options: {5defaultLayouts: {6default: require.resolve("./src/components/Layout.js"),7},8},9},10{11resolve: "gatsby-source-filesystem",12options: {13name: "posts",14path: `${__dirname}/content/posts`,15},16},17];
As a result, it will load anything that it finds in the path /content/posts as part of the data layer, and because we have gatsby MDX plugin installed it's going to look for MDX files and transform those into graphql nodes.
The whole reason for using MDX is because we want to add some sort of interactivity in the markup generated pages.
Now that we added configuration to look for files in the system and transform them to graphql nodes, we would need to generate those post files as pages programmatically using gatsby API createPages by configuring that in gatsby-node.js.
Gatsby in itself has a couple of available APIs that can be used to extend how gatsby works, inside of those you can export a function that is the same name as one of the hooks that gatsby looks for. As a result, gatsby will do those instructions at the build phase.
In this case, we want to create pages so we use exports.createPages and because we are going to load data we make the function async.
Gatsby will give us a couple of utility methods such as actions, graphql helper and reporter(which can be used in case you want to put something in the console, it's a gatsby internal kind of console.log)
gatbsy-node.js MDX
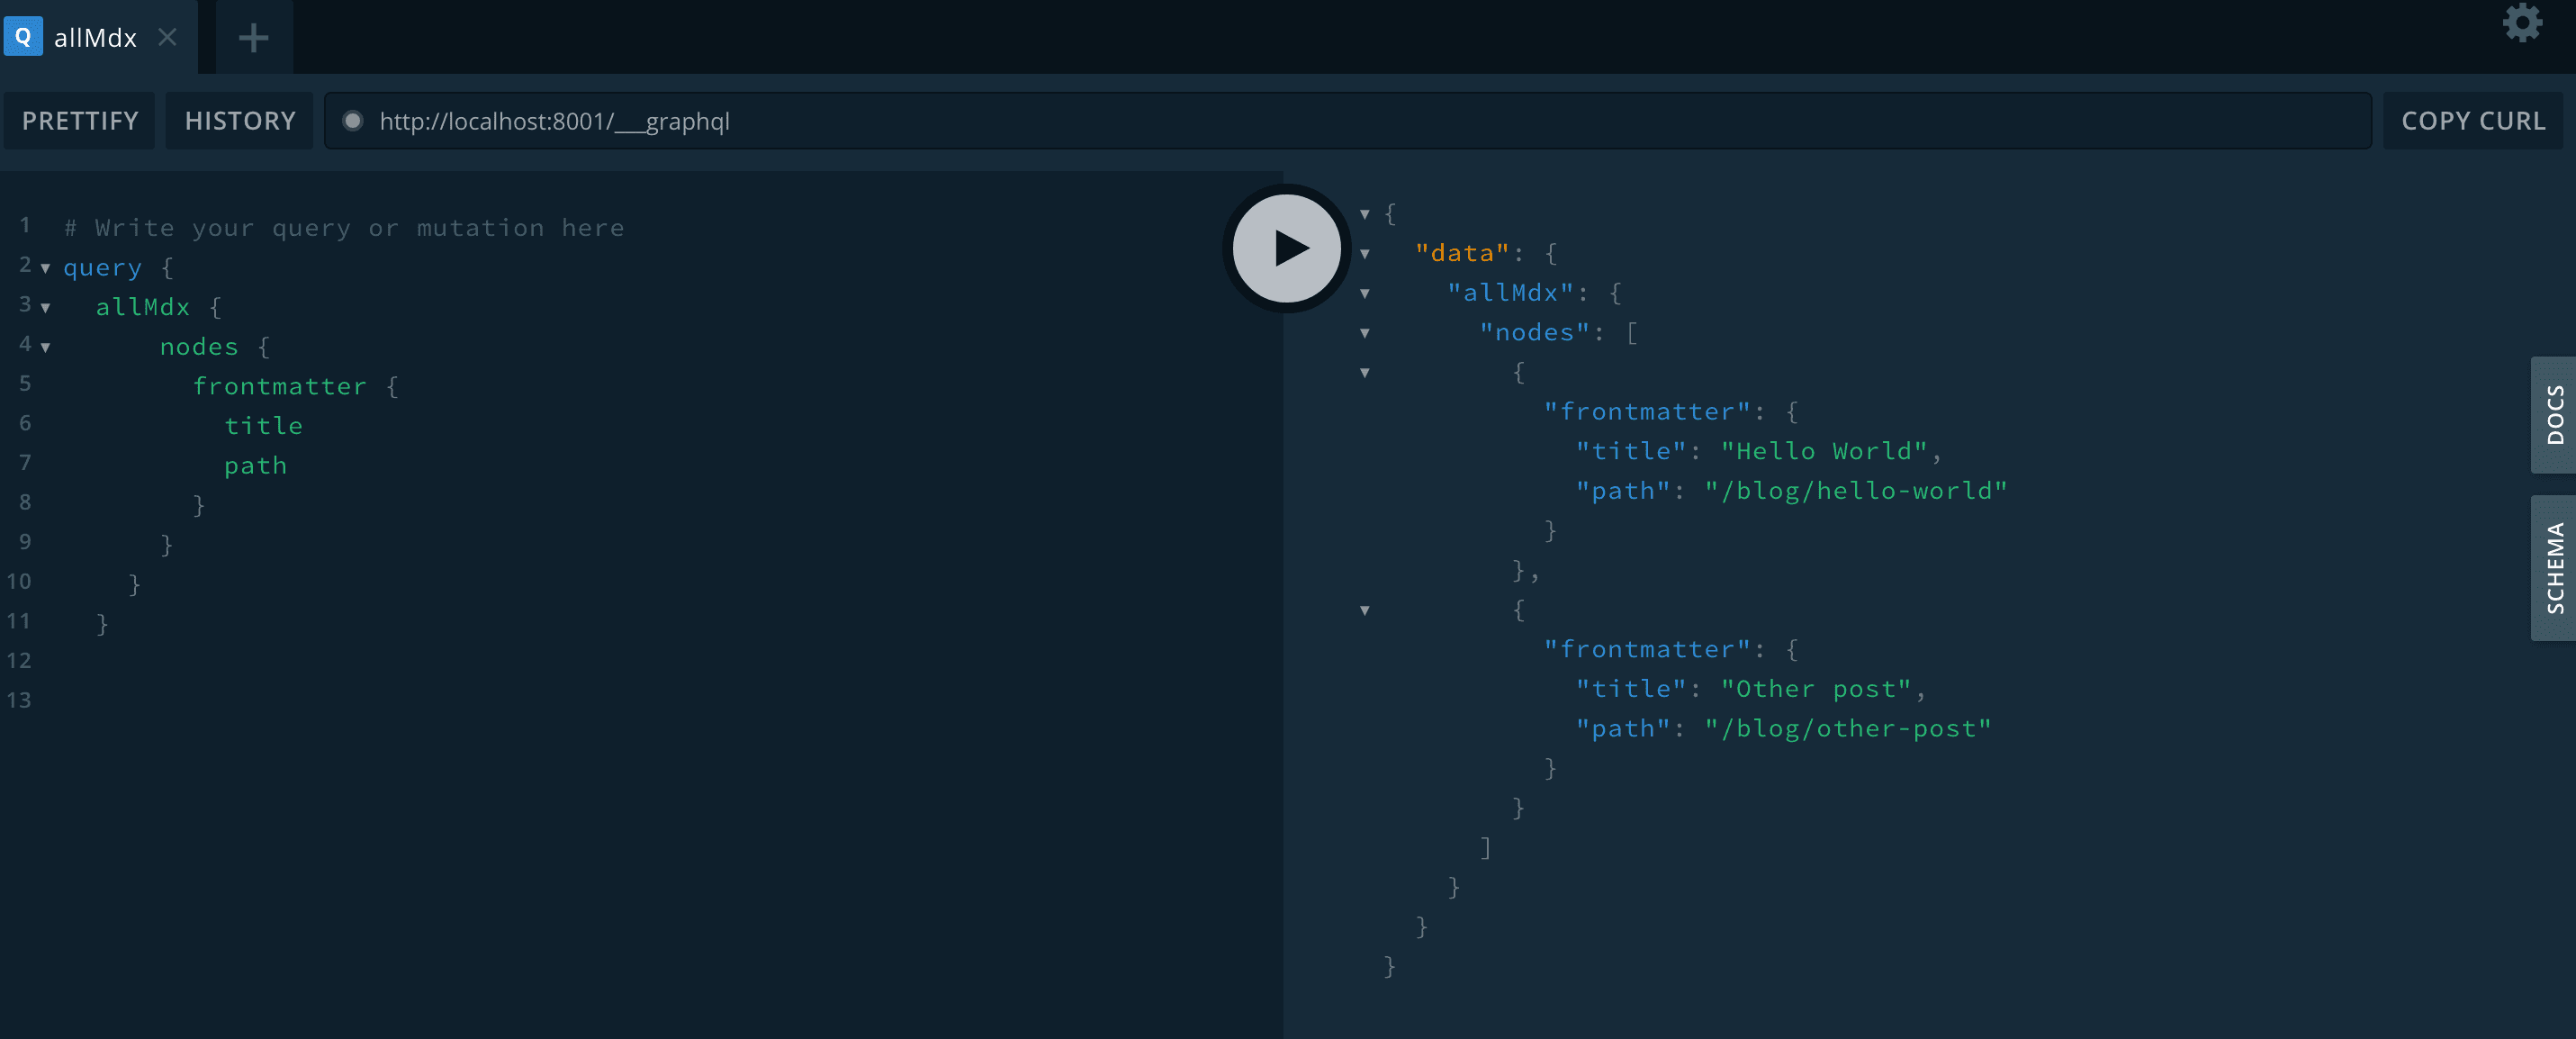
1exports.createPages = async ({ actions, graphql, reporter }) => {2const result = await graphql(`3query {4allMdx {5nodes {6frontmatter {7path8}9}10}11}12`);1314if (result.errors) {15reporter.panic("failed to create posts ", result.errors);16}1718const pages = result.data.allMdx.nodes;1920pages.forEach((page) => {21actions.createPage({22path: page.frontmatter.path,23component: require.resolve("./src/templates/postTemplate.js"),24context: {25pathSlug: page.frontmatter.path,26},27});28});29};
In the createPage function, we will use graphql helper to fetch the nodes from the data layer by passing a graphql query as you can see in the snippet above.
Then, we create the pages using actions.createPage as we loop through these pages that came back as an array to generate them programmatically as you can see in the screenshot below
actions.createPage takes an options object as a parameter that has 3 properties: path, component and context. Path is what we have defined in the MDX frontmatter. Component takes in the path to the template you want to use for these pages. Below is a sample snippet used as page template.
1import { graphql } from "gatsby";2import { MDXRenderer } from "gatsby-plugin-mdx";3import React from "react";45import Layout from "../components/Layout";67export const query = graphql`8query ($pathSlug: String!) {9mdx(frontmatter: { path: { eq: $pathSlug } }) {10frontmatter {11title12path13}14body15}16}17`;1819const Post = ({ data: { mdx: post } }) => {20const { title } = post.frontmatter;21const { body } = post;22return (23<div>24<Layout>25<h1>{title}</h1>26<MDXRenderer>{body}</MDXRenderer>27</Layout>28</div>29);30};3132export default Post;
Context takes in an object with pathSlug as its property which value is the page path.
Once we finish adding the above, now we can add interactivity to our MDX pages which would look like this
1---2path: "/blog/hello-world"3date: "2020/01/01"4title: "Hello World"5summary: "hello world post"6---78import Counter from "../../../src/components/Counter";910Hello World1112<Counter />

Following the post and you can find a starter repo here that shows usage of MDX pages
If you found this post helpful, then you will love this one as it shows you how to add syntax highlighting to MDX files.